|
|
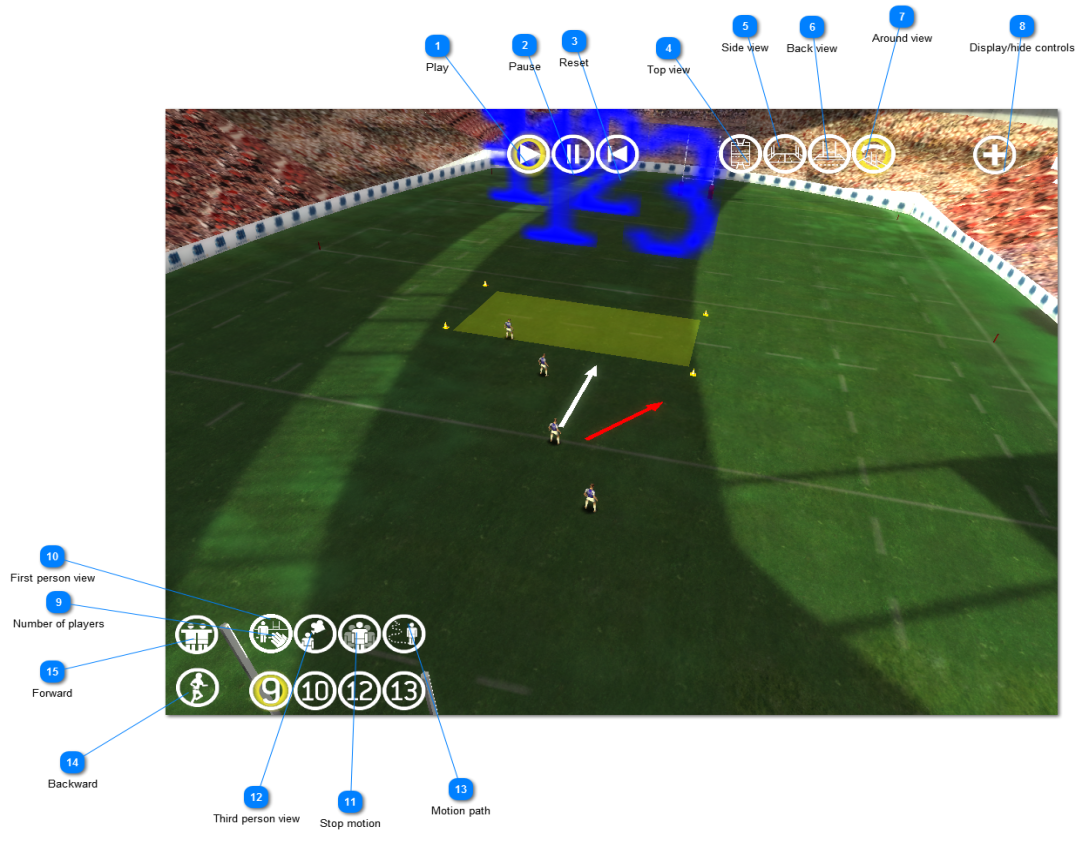
 Play
Starts the animation. The keyboard shortcut is "P" (as Play...).
| |
 Pause
Pauses. Suspend all the animations and other effects (blue-ribbon trajectories, stopmotion). Relaunches the animation from its previous state.
| |
 Reset
Rewinds all the animations of the players and the ball at their original positions.
Also cancels the effects such as the blue ribbon materializing path, and the effect of "stop motion".
| |
 Top view
Switches to the camera placed above the ground. The players appear only as circles, the ball is white.
The keyboard shortcut is T (for "Top").
| |
 Side view
Switches to the side camera and allows it to move with the mouse as if it was on a tracking shot along the ground.
The keyboard shortcut is S (for "Side")
| |
 Back view
Switches to the camera located behind the red goals. The camera is fixed.
The keyboard shortcut is B (for "Back").
| |
 Around view
This view allows you to turn around the ground. The keyboard shortcut is A (as "Around" ...).
A zoom is available via the mouse wheel.
| |
 Display/hide controls
Hides the buttons to lighten the interface and see in a better way the players.
Click on it to displays again the buttons.
Also reloads the intermediate file generated by the software RugbySketcher used by the coach, and thus, refreshes the animation.
| |
 Number of players
Numbers of each player that the coach has created. The yellow circle indicates which player is selected. So it displays a popup menu associated with each player.
Only the numbers of blue players are shown to alleviate the number of buttons on the screen. To put in place a red, you can use the view "free" via the keyboard shortcut "F", or switch the blue team in red.
| |
 First person view
Lets get to the place of the player. The head orientation is limited when the player is looking up and down. The orientation of the player's head on the sides allows at least a field view equal to 180 °.
| |
 Stop motion
Stops the movement of all players except the one designated. Lets put the focus on the movement of a player in the defense by example.
Caution : animations / positions of other players were arrested when you press the button. Ex: if this effect is activated at the beginning of the action, the players remain in their starting position.
If this effect is activated in the middle of the action, players will keep the position they had at the time of the action.
This effect stops when you press the reset button. This effect did not stop on the clicks of buttons Play and Pause.
| |
 Third person view
A view which allows for the camera to follow the player designated. Also allows the mouse to rotate around the player. A zoom is available with the mouse wheel.
| |
 Motion path
Activates on the designated player, the motion path that is materialized by a semitransparent blue ribbon .
The blue ribbon fades after a few seconds.
This effect stops when you press the reset button. This effect did not stop after clicking on buttons Play and Pause.
| |
 Backward
Displays / hides the number of the backwards.
| |
 Forward
Displays / hides the number of the forwards.
| |
|
|